Feature
How to Decide Whether You Are Ready for the Remote Reflection Canyon Overlook
By Riley Mercer
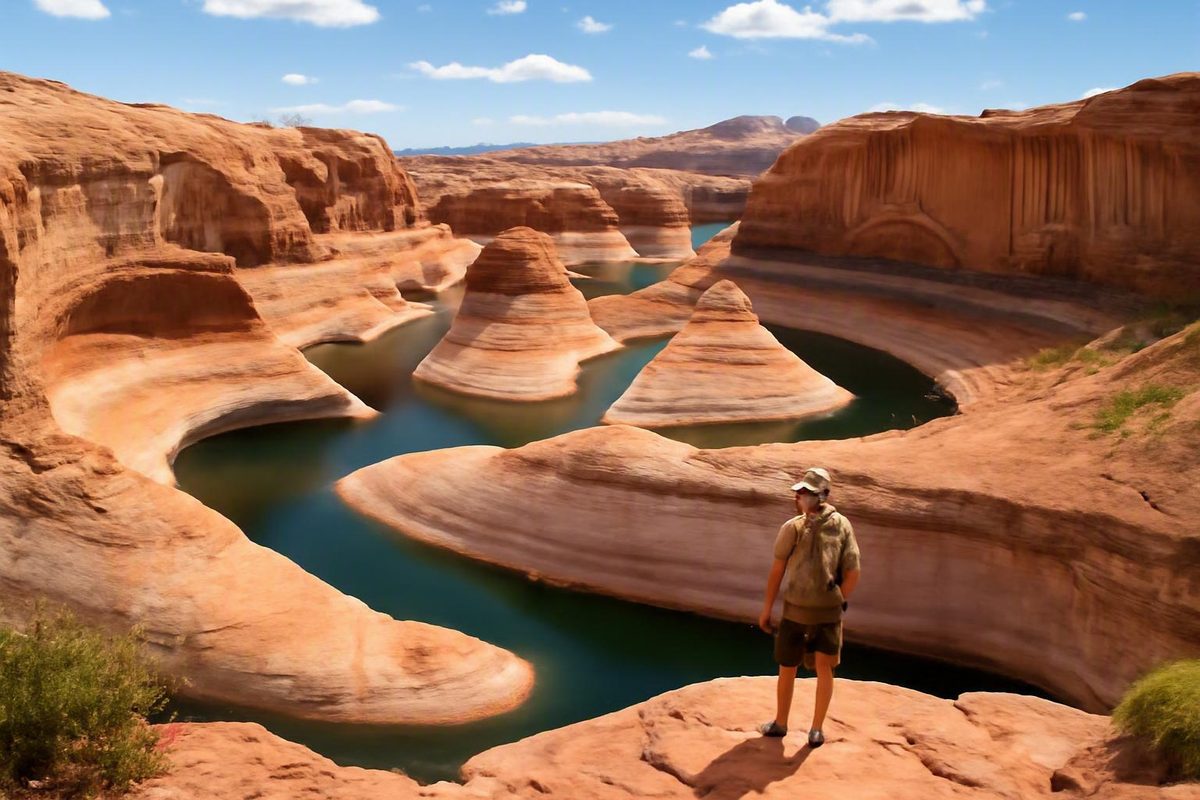
Reflection Canyon is not a conventional roadside viewpoint, and the overland route to the famous elevated overlook is not a maintained hiking trail. Reaching it generally means driving deep into the Utah backcountry, carrying all necessary water, and navigating miles of exposed desert and open slickrock without dependable cellular service.
The central planning question is not simply, “Can I hike 16 miles?” It is whether your group can manage uncertain road conditions, off-trail navigation, a heavy water carry, primitive camping or a long day hike, and a delayed return without expecting quick assistance.
Evidence and verification note — reviewed August 5, 2026
This is a readiness framework based on third-party route guides and dated traveler reports. The available evidence does not establish current permits, fees, closures, road conditions, reservoir levels, camping zones, waste rules, fire restrictions, drone rules, or pet rules.
Before leaving Escalante, ask Glen Canyon National Recreation Area and the Escalante Interagency Visitor Center to confirm which office currently manages each part of the trip and where to obtain authoritative park alerts, permits, road reports, weather and flash-flood information, reservoir data, and emergency contacts. Do not treat any legal or access statement in a travel blog as current policy.
Reflection Canyon at a Glance: Location, Access Options, and the Reality Behind the Photos
Reflection Canyon is a tributary or arm associated with Lake Powell in southeastern Utah, within Glen Canyon National Recreation Area. The image most hikers recognize—curving water enclosed by sandstone and viewed from above—comes from exposed terrain above the canyon rather than a developed overlook.
There are three broad ways to experience the area:
- A demanding overland day hike: Carry everything needed for a long, exposed out-and-back journey and return to the vehicle the same day.
- An overnight backpack: Carry camping equipment and substantially more water, then camp only where current rules allow.
- A lake-based approach: Travel by boat toward or into Reflection Canyon, subject to reservoir level, weather, navigation, shoreline, landing, and operator logistics.
The overland and boat experiences are not interchangeable. A boat may provide views from water level inside or near the canyon, but it does not automatically reach the elevated perspective associated with the best-known photographs. Some boat-based visits have also involved difficult scrambling after landing.
For the overland journey, use approximately 15–18 miles round trip as a planning range rather than a fixed trail statistic. AllTrails lists a 15.5-mile route with 1,584 feet of gain, while its route description warns of unmarked sections, unreliable cell service, and no water (AllTrails route listing). OnX displays 15.16 miles and 1,814 feet in its route table but describes approximately 18–20 miles in the narrative, illustrating how route choice and navigation affect recorded distance (onX Reflection Canyon route).
Published elevation totals also vary materially. Established third-party guides report figures from roughly 1,200 feet to more than 1,800 feet, and one personal GPS report was substantially higher. Elevation is therefore less useful than exposure, terrain, navigation demands, water weight, and total time when assessing difficulty.
Reflection Canyon quick facts
- Overland distance: Approximately 15–18 miles round trip; route variation or errors can push the total toward 20 miles
- Elevation: Variable by track and measurement method
- Trail: No maintained or continuously marked route
- Water: No dependable source; plan to carry the complete supply
- Shade: Little or none
- Cell service: Reported as unreliable or absent
- Navigation: Off-trail competence and redundant tools needed
- Road access: Long, rough travel on Hole-in-the-Rock Road
- Camping: Primitive and subject to current rules
- Best fit: Experienced desert hikers and backpackers prepared for self-rescue
The photographs can make Reflection Canyon look like one destination reached by one obvious route. In practice, the drive, hike, weather, water load, navigation, campsite decision, and return are parts of the same remote undertaking.
How Hard Is the Reflection Canyon Hike?
Reflection Canyon is strenuous because several challenges compound. The mileage may be manageable for a fit hiker on a maintained trail, but here it comes with prolonged sun exposure, a complete water carry, sand, uneven sandstone, ravines, route-finding, rough vehicle access, and limited emergency support.
A sandy or faint desert path may be discernible during much of the early approach. That does not make it a maintained trail. User paths can split, fade, or drift, especially when the terrain changes from sand and sagebrush to broad sandstone.
The final approximately two to three miles are the section most consistently associated with difficult navigation. One firsthand guide describes following paths near a cliff base for about 5.5 miles before crossing slickrock and petrified dunes, with the final two to three miles requiring especially careful route-finding and involving several off-route corrections (Back o’ Beyond trip report).
Likely terrain includes:
- Sandy paths and loose desert soil
- Sagebrush and low vegetation
- Dry washes and ravines
- Sandstone slabs and broad slickrock
- Rocky ledges
- Repeated short climbs and descents
- Occasional awkward steps or scrambling
No recorded track is guaranteed to represent the safest line for current conditions or for your group. Navigation means interpreting the landscape—not merely keeping a location icon on a colored line.
Pack weight also changes the route. A modest-looking elevation profile feels different when the pack contains a full day’s water. An overnight load adds shelter, insulation, food, waste-management equipment, and additional water.
Reported times should be treated as examples rather than performance targets. Traveler reports range from approximately three to five hours each way. One party completed just over 15 miles in about nine hours, including time at the viewpoint, after navigating an unclear route over slickrock (Court and Nate day-hike report). Other guides estimate approximately seven to ten hours total for a day hike. None of those figures accounts for your group, weather, route errors, pack weight, photography plans, or fatigue from the access road.
Budget time for:
- Frequent position checks
- Safe backtracking and route corrections
- Food, foot care, and water breaks
- Slower movement across slickrock
- Group decisions
- Viewpoint and photography time
- A return pace that may deteriorate with fatigue
- The long drive back toward Escalante
Suitability checklist
Before treating Reflection Canyon as a realistic objective, every group should be able to answer yes to the following:
- We have successfully navigated off trail using more than one method.
- We have prior experience in exposed desert terrain.
- We can carry the planned water supply with the rest of our equipment.
- We are comfortable moving over uneven sandstone and slickrock.
- We can recognize when a GPS track suggests an unsafe line.
- We have tested first-aid, foot-care, repair, lighting, and emergency equipment.
- We have a self-rescue plan that does not depend on cellular service.
- We are willing to turn around before reaching the overlook.
Fitness cannot substitute for navigation competence, and a downloaded track cannot substitute for judgment.
Getting to the Trailhead: Why Hole-in-the-Rock Road Is Part of the Expedition
The commonly reported overland approach begins near Escalante and follows Hole-in-the-Rock Road. Third-party accounts place the informal Reflection Canyon pull-off approximately 50–51 miles down the dirt road.
In favorable conditions, use two to three hours from Escalante as a conservative planning range. Individual traveler reports range from about 1.5 hours in a modified four-wheel-drive vehicle to approximately 2.5 hours. Faster experiences should not become schedule assumptions. The drive must also be repeated after a long day hike or on the second day of an overnight itinerary.
The pull-off may be small, informal, and unmarked. Save a reviewed trailhead position offline before losing service, and record the vehicle’s actual coordinates after parking. Do not depend on signs, other vehicles, or an obvious trail entrance.
Recurring road descriptions include:
- Long washboard sections
- Loose sand
- Embedded or sharp rocks
- Rough wash crossings
- Ruts and erosion
- Mud or storm damage
- Conditions that deteriorate farther from the highway
Rain can create both mud and fresh road damage. CleverHiker describes approximately 50 miles of dirt-road access, a two-to-three-hour drive from Escalante in favorable weather, and the possibility of the road becoming impassable after rain (CleverHiker access guide).
Third-party guides commonly recommend high-clearance four-wheel drive, but that is not evidence of a current legal requirement or a guarantee that any particular vehicle will succeed. A crossover or minivan reaching the pull-off on one previous trip does not establish that a similar vehicle is prudent now. Tire construction, ground clearance, vehicle loading, driver experience, recent maintenance, rainfall, and the location of fresh damage all matter.
Vehicle-readiness checklist
The following is a conservative editorial checklist, not an agency equipment rule:
- A properly inflated spare tire suitable for the vehicle
- A jack and tools that function on uneven ground
- Tire-repair and inflation equipment
- Jump-start capability
- Fuel for the complete road journey and delays
- Food and water beyond the hiking allocation
- Clothing and shelter for an unplanned delay
- Recovery equipment appropriate to the vehicle and user
- Offline maps and saved coordinates
- A plan that does not depend on cellular service
Recovery equipment is useful only when it is suitable for the vehicle and the user knows how to deploy it safely. It should not encourage travel beyond the driver’s experience.
Immediately before departure, obtain a dated road report from the currently responsible authority and check the forecast for the entire road corridor—not only the overlook. Ask the visitor center or park office which authority has the latest road assessment. Postpone the trip when rain threatens access or when no reliable current report can be obtained.
A static guide cannot determine whether a particular vehicle is suitable under changing conditions.
Navigation: What Happens When the Visible Path Disappears
It is safer to understand the journey as a sequence of terrain stages than as a set of text-only turns:
- Initial desert travel: A sandy or faint path may make the first portion relatively easy to follow.
- Travel near a long cliff line: The route continues through open desert, with cliffs or prominent sandstone features serving as broad orientation references.
- Transition around the five- to six-mile range: The path becomes less useful as the terrain shifts toward sandstone.
- Final open-slickrock approach: The last two to three miles require active line selection, repeated position checks, and occasional backtracking.
These transitions are approximate. Recorded tracks differ, and actual mileage changes with route choice. A firsthand September 2023 account described an unmarked route through slickrock, sandy washes, and rocky ledges and reported using a GPS unit, phone mapping, and paper map and compass rather than relying on one tool (dated Reflection Canyon trip report).
Third-party descriptions use inconsistent labels such as “left,” “eastern,” “lower,” and “shorter” for route variants. Those terms may refer to different maps, orientations, or forks. They cannot responsibly be combined into one definitive direction without a verified map and terrain assessment. Do not choose a branch simply because a blog calls it preferred.
Cairns, footprints, and worn patches may be intermittent, absent, or misleading. Footprints can lead away from the vehicle. User traces are observations, not a complete navigation system.
Build genuine navigation redundancy
A prepared group should have:
- Route data reviewed and downloaded before departure
- A charged GPS-capable phone or dedicated GPS unit
- Spare battery power and protected charging cables
- A paper topographic map
- A compass and the skill to use it
- Saved trailhead coordinates
- The vehicle’s actual parked location
- Waypoints recorded only at meaningful, confirmed locations
For this remote route, the conservative editorial standard is that groups should also carry functioning two-way satellite communication with an active plan. This is a safety recommendation, not a claimed legal requirement.
Check position regularly while the route still seems obvious. Waiting until the path has vanished makes it harder to identify the last confirmed point. Monitor elapsed time, water use, weather, and device power, and compare the terrain ahead with the map instead of following an app line blindly.
Use the slickrock transition as a decision point
Before committing to the final miles, stop and evaluate:
- Remaining daylight
- Current and approaching weather
- Water already consumed
- Group pace and condition
- Foot problems or equipment failures
- Battery levels across navigation devices
- Confidence in the outbound line
- Confidence in retracing that line
- Whether one person is relying on the group beyond their ability
This is an appropriate turnaround point. Continuing should require positive answers, not optimism.
If the route is lost, stop before increasing the error. Compare independent navigation tools, identify the last confirmed position, and retrace safely when possible. Do not descend an unfamiliar ledge or enter a drainage solely because it points toward the destination icon. If injury, darkness, exposure, water depletion, or terrain has pushed the situation beyond the group’s self-rescue capability, use emergency communication and provide precise location and condition information.
Do not publish fragile campsite coordinates or cultural-resource locations. An unofficial track should never be represented as agency-approved merely because it appears in a popular app.
Water, Heat, Weather, and Turnaround Planning
Plan as though there is no dependable water anywhere on the overland route. Stagnant puddles, temporary rainwater, and old trip reports are not a water plan. The reservoir should not be treated as a practical refill source from the elevated overlook; third-party descriptions say the intervening terrain is too high, steep, or otherwise impractical to access safely (CleverHiker water guidance).
There is no universal number of liters that makes this journey safe. Dated reports describe approximately 3.5–6.5 liters consumed on some hikes, while some overnight travelers suggested or carried 10 liters or more. One early-May backpacker reported carrying seven liters and using 6.5 liters during a roughly 16-mile overnight route (Earth to Sarah trip report). Another traveler reported carrying 14 liters during a mild March trip and using almost all of it, showing why one person’s quantity cannot become a universal prescription (Fox in the Forest guide).
Build a water plan from:
- Forecast temperature and direct-sun exposure
- Anticipated total duration
- Your measured consumption on comparable desert trips
- Body size and acclimatization
- Pace and exertion
- Pack weight
- Food and cooking needs
- Overnight duration
- Any legally and practically appropriate pet requirements
- A protected emergency reserve
Record actual consumption during the outbound journey. Decide before departure how much must remain for the return and when unexpectedly high use will trigger a turnaround. If the group is consuming water faster than planned, shorten the trip instead of assuming the return will be cooler, easier, or faster.
Little or no shade means even moderate air temperatures can produce demanding conditions under direct sun. Sun-warmed rock and a water-heavy pack add to the physical burden. Do not use comfortable temperatures in Escalante or at the vehicle as proof that the exposed route will remain comfortable all day.
Seasonal risks differ:
- Summer: Severe heat, intense sun exposure, and the possibility of monsoon storms
- Colder months: Freezing nights, shorter daylight, wind, and possible winter weather
- Spring and fall: Often favored in traveler reports but still subject to heat, cold, strong wind, rain, and sudden storms
Heavy rain creates two separate planning problems: hazardous conditions around washes or confined terrain and a muddy, damaged, or impassable access road. Completing the hike does not guarantee the vehicle can leave.
Conservative go-or-no-go review
Postpone or turn around when any critical issue remains unresolved:
- Rain threatens the access corridor.
- Forecast heat exceeds the group’s demonstrated desert capability.
- Wind makes exposed travel, camping, or cliff-edge activity unsafe.
- The group cannot carry its calculated water supply and reserve.
- Daylight is inadequate for the expected pace.
- Route data or navigation equipment is missing or untested.
- Device power is failing without effective backup.
- The group lacks a workable emergency-communication plan.
- A member is deteriorating physically or mentally.
- The return route is no longer understood with confidence.
Establish these criteria before leaving Escalante, revisit them at the slickrock transition, and enforce a predetermined turnaround time. Avoid universal temperature, wind, or water thresholds: the responsible decision depends on the forecast, itinerary, equipment, and demonstrated abilities of the group.
Immediately before departure, obtain the latest official weather forecast, flash-flood information, park alerts, and road report through the agencies identified by the park or visitor center. Recheck as late as practical. If the responsible office cannot be identified or current information cannot be obtained, treat that uncertainty as a reason to postpone.
Day Hike or Overnight Backpack?
A day hike avoids camping equipment but compresses the road journey, route, viewpoint, and return into one extended day. An overnight reduces some time pressure and creates access to sunset or sunrise, but it requires a heavier water carry and introduces primitive-camping hazards.
| Planning factor | Day hike | Overnight backpack |
|---|---|---|
| Total commitment | Long hike plus lengthy road travel on both sides | Usually two days, one primitive night, and the same road travel |
| Reported hiking time | Commonly treated as a full-day journey; examples are around 7–10 hours | Traveler reports often describe roughly 3–5 hours each way |
| Water and gear burden | Full hiking water, food, layers, lighting, and emergency equipment | More water plus shelter, sleep system, insulation, food, and waste equipment |
| Navigation in darkness | Delays can push the return beyond daylight | Darkness may affect sunset, sunrise, camp movement, or an early departure |
| Photography | Less time and fewer lighting options | Better access to sunrise and sunset |
| Campsite impact | No overnight campsite | Requires legal, careful use of a durable surface |
| Consequence of delay | Possible night navigation and a late road exit | Possible disruption to water, food, weather, and second-day driving plans |
The times in the table are traveler examples, not standards. Pack weight, route errors, weather, photography, and group pace can materially change them.
A conservative day-hike framework
Build the schedule backward from available daylight and the return drive rather than selecting one fixed departure time.
- Reach the trailhead early enough to preserve a large daylight margin.
- Confirm the vehicle position and all navigation systems before walking.
- Check position, pace, water use, and group condition regularly.
- Reassess at the slickrock transition.
- Enforce a predetermined turnaround even when the viewpoint seems close.
- Shorten viewpoint time if the return margin begins shrinking.
- Preserve enough attention and energy for the drive out.
The lighter pack is an advantage, but day hikers may feel pressure to continue because they lack overnight equipment. That makes a firm turnaround especially important.
A conservative two-day framework
On day one, start early enough to reach the intended camping area with ample daylight for route confirmation and site selection. Camp only where current rules allow, on a durable surface away from cliff edges, vegetation, biological soil crust, and any obvious drainage exposure.
On day two, allow time to retrace the route, handle navigation delays, and complete the road journey before changing weather or fatigue becomes a larger problem.
Camping is primitive. The available evidence does not confirm designated campsites. Flat ground may be scarce; sandstone may not accept stakes, while sandy depressions can be limited. Wind can make exposed areas uncomfortable or unsafe.
The overlook includes exposed cliff edges. Keep sleeping areas and routine movement well back from drops. Do not walk backward while composing photographs or move toward an edge while looking through a viewfinder.
Several photographers favor sunrise for reflected light, but that is trip-report experience, not a guaranteed condition. Clouds, wind, reservoir elevation, and sun angle can change the result. No photograph justifies pathless travel near cliffs in darkness.
Before an overnight trip
Verify the current permit process, legal camping areas, closures, fire rules, stove restrictions, food-storage expectations, and human-waste requirements through the responsible official office. If those rules cannot be confirmed, do not camp.
Permits, Camping Rules, and Low-Impact Travel
Current rules require direct official verification
The available traveler accounts do not reliably establish current permits, fees, issuing locations, reservation procedures, camping zones, human-waste requirements, fire restrictions, drone rules, or pet rules. This section describes the conflict; it does not resolve current law or policy.
A 2022 first-person account stated that no permit was required at that time (dated 2022 traveler account). That statement is historical and should not be treated as current.
Other traveler accounts describe overnight permits obtained at the Escalante Interagency Visitor Center, established trailheads, or other locations. Some call permits free, while another mentions a permit fee and separate area charge. Counting repeated blog claims does not establish current rules.
Before travel, ask the responsible official office:
- Is anything required for day use?
- Is an overnight permit required?
- Is it reserved, issued in person, self-issued, free, or paid?
- Do entrance or recreation fees apply?
- Where is camping legal?
- Are any zones closed?
- What is the current human-waste disposal rule?
- Are fires or particular stoves restricted?
- What drone restrictions apply?
- Are pets permitted?
- What leash and pet-waste rules apply?
- Are there seasonal or emergency closures?
- Which authority has the current Hole-in-the-Rock Road report?
- Where are current park alerts and emergency contacts published?
Do not proceed on the assumption that a visitor center, kiosk, or trailhead will issue whatever document is needed. Confirm the process before beginning the remote drive.
Protect the desert surface
Biological or cryptobiotic soil crust often appears as dark, raised, bumpy desert ground. It can look like ordinary dirt but is fragile under footsteps, tires, pets, and camps. Travel on durable rock or already-disturbed sand where permitted, and do not create new social routes simply to shorten the journey.
Camp compactly on durable surfaces where legal. Avoid expanding sandy clearings, moving rocks to build tent pads, or placing equipment on vegetation or crust.
Pack out ordinary trash and pet waste. Confirm the current human-waste requirement before leaving town, then carry the equipment necessary to comply. Do not assume burial is allowed because it is common on another backcountry trip.
Leave archaeological and cultural material exactly where it is. Do not touch, move, enter, climb, or publicly speculate about objects or structures. Avoid sharing coordinates or detailed directions to cultural sites or fragile campsites. Ask the responsible park office how suspected damage should be reported rather than improvising a reporting process.
Legal pet access and practical suitability are separate questions. Even if dogs are currently permitted, heat, lack of shade, slickrock, paw injury, additional water demand, leash management, waste removal, and evacuation remain serious considerations. A group bringing an animal must be capable of carrying it out if it can no longer walk.
Boat Access, Photography, and the Final Go-or-No-Go Decision
Reflection Canyon may be approached from Lake Powell, but “boat access” does not mean stepping directly from a boat onto the famous overlook. Water-level visitors experience the canyon walls, shoreline, channels, and changing reservoir. The overland perspective looks down on the larger curves and surrounding sandstone.
One firsthand photography account describes a guided boat visit that still required climbing approximately 400–500 feet in about half a mile while carrying 40–50-pound packs. The author also reported narrow ridges before reaching the upper photography area (boat-based Reflection Canyon report). That single itinerary does not establish a current landing route, operator, difficulty, or safe approach.
Other historical descriptions place the canyon near Lake Powell mile marker or buoy 57. Those references are not substitutes for current marine charts, official navigation information, reservoir conditions, or local expertise.
Reservoir elevation can change:
- How far a boat can travel into the canyon
- Which rocks and channels are exposed
-
Shoreline and landing feasibility
-
The visibility of the canyon’s curves
- Whether historical access descriptions remain relevant
Do not assume a boat can currently dock or land at a previously described location. Confirm current launch conditions, reservoir information, marine navigation requirements, weather, and the status and authorization of any rental company, marina, guide, or transport service.
For photographers, light is only one planning variable. Sunrise may produce reflections reported favorably by previous visitors, while sunset may offer warm color or stronger shadows. Changing water levels can alter the composition. Darkness makes route-finding harder, and exposed cliffs make careless repositioning potentially catastrophic.
Scout compositions in daylight. Establish a boundary back from edges, secure loose equipment, switch on headlamps before twilight becomes darkness, and retain a redundant route back to camp or the vehicle. Do not separate from the group without an agreed communication plan.
Final go-or-no-go checklist
Proceed only if every critical question has a satisfactory answer:
- Current official access rules and permits have been verified.
- Road and weather reports are recent and favorable.
- The vehicle and driver are appropriate for current conditions.
- The group can carry a condition-based water supply and reserve.
- Everyone understands the distance and route uncertainty.
- Navigation tools are redundant, downloaded, charged, and tested.
- The group has functioning two-way satellite communication.
- Vehicle repair and suitable recovery supplies are aboard.
- Group members have relevant desert and off-trail experience.
- A turnaround time and decision points have been agreed upon.
- A trusted contact has the itinerary and overdue-response plan.
The trip plan left at home should include the route, trailhead area, vehicle description and plate, group members, communication-device details, expected return, and specific instructions for what the contact should do if the group becomes overdue.
A practical final verification sequence is:
- Confirm jurisdiction, current rules, permits, and closures.
- Obtain a dated Hole-in-the-Rock Road report.
- Check the latest weather and flash-flood information for the complete route and road corridor.
- Confirm current reservoir and marine information if approaching by boat.
- Recalculate water, daylight, and turnaround plans from the current forecast.
- Test navigation, lighting, satellite communication, and vehicle equipment.
- Leave the complete trip plan with a trusted contact.
- Recheck conditions immediately before committing to the road.
Frequently Asked Questions
How long is the Reflection Canyon hike?
Plan on approximately 15–18 miles round trip for the overland route, while recognizing that route choice, backtracking, and navigation errors can push recorded mileage toward 20 miles. AllTrails lists 15.5 miles, but there is no fixed maintained trail, so individual recordings vary (AllTrails route listing).
Can Reflection Canyon be completed as a day hike?
A prepared and experienced group may complete the route as a day hike. Third-party estimates and traveler reports commonly place the journey within a full-day range, including an estimate of approximately seven to ten hours. The plan must also account for navigation delays, viewpoint time, fading daylight, and the long drive on Hole-in-the-Rock Road.
A day hike reduces camping weight but increases pressure to finish in one push. Begin with a substantial daylight margin, monitor progress, and enforce a preset turnaround.
How much water should I carry to Reflection Canyon?
There is no safe universal quantity. Plan as though no dependable water is available and calculate the supply from the forecast, duration, body size, acclimatization, personal consumption history, pace, pack weight, meals, overnight needs, and an emergency reserve.
Track consumption during the outbound journey and protect the amount allocated for the return. If water is being used faster than planned, turn around. Do not expect to reach Lake Powell for a refill from the elevated overlook.
Do I need a permit to hike or camp at Reflection Canyon?
Current requirements cannot be established from the supplied traveler accounts. The accounts conflict: one dated report said no permit was needed at that time, while others describe overnight permits, inconsistent issuing locations, and different fee information.
Confirm day-use requirements, overnight permits, fees, legal camping areas, waste disposal, closures, fire restrictions, drone rules, and pet rules directly with the responsible official office before travel. If you cannot verify them, do not camp or undertake an activity whose legality remains uncertain.
Can I reach Reflection Canyon by boat instead of hiking?
Reflection Canyon can be approached from Lake Powell, subject to current reservoir elevation, launch access, marine navigation, weather, shoreline, landing, and service availability. A boat provides a water-level canyon experience; it does not automatically reach the elevated overlook seen in familiar photographs.
Some firsthand and historical boat accounts include shoreline hiking or steep scrambling. Confirm current conditions and authorized services rather than relying on old landing descriptions.
Reflection Canyon rewards preparation rather than improvisation. Proceed only after confirming current rules and conditions, securing appropriate transportation, carrying a condition-based water supply, preparing redundant navigation and emergency communication, and agreeing to a firm turnaround plan. If the road, forecast, water load, navigation capability, boat logistics, or official requirements remain uncertain, postponing the trip is the responsible decision.